Historical Detection
Historical Detection includes the ability to search across the enterprise for any existing infections or attack activity that may have occurred in the past. Historical Detection is important for a variety of reasons but one great example could be that a state-sponsored group infiltrated your organization over a year ago prior to having any Real-Time Detection capabilities in place. Having knowledge of this incident and gathering indicators can be imperative for any future detections. Building out threat profiles for the groups that target you, the information they’re specifically after, the types of tools and backdoors that they use, and even the type of command and control infrastructure, can all be very relevant.
So how do we do Historical Detection? The Digital Guardian agent has a built-in forensic scanner which can be called-upon in an ad hoc fashion, scheduled on a regular basis, or even executed based on a rule triggering. I’ll discuss the latter two in a moment, but the first one (ad hoc forensic scanning) can be used for conducting an enterprise threat hunt. One technique we commonly use for those hunts in our Managed Services offering is acquiring the Application Compatibility Cache a.k.a. ‘Shimcache’ from each endpoint, parsing that data and then storing within a database or within an indexing engine like Splunk for analyzation. This technique of course is not groundbreaking or something we even developed, but has been around for many years and used by incident responders during investigations. Having the power to do this now across an entire organization can yield some very interesting results because the Shimcache will store historical file execution from that endpoint. During one investigation for a customer, whom had 60,000+ endpoints, we used the forensic scanner’s ability to collect the Shimcache registry keys and picked up on the usage of Mimikatz, which is a common password dumping tool. Traces of this activity had occurred on 37 machines over two years ago! Analyzing the data a bit further, we were then able to detect additional tools being used by a threat actor group and build out a mapping of everywhere they went, a timeline of their actions, and even provide an attribution to the group behind the attack. Although two years ago seemed ages ago, the timeline analysis that was built from those machines showed activity from this group as recent as a month back! Meaning the threat actor was still active (but not for long!). This of course is just one example that can be leveraged for historically investigating devices.
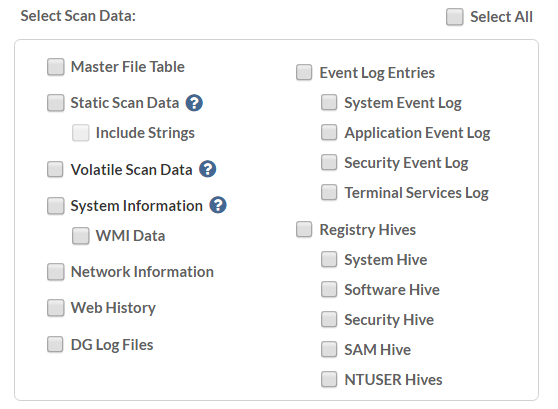
In addition to acquiring specific registry keys of interest, we can also collect raw artifacts that are often used in investigations such as the $MFT file, Event Logs, Prefetch, etc. This is great during Incident Response engagements because it can automatically be collected based on a rule firing or, if you have a list of machines that you’d like to collect forensics from. Below is a listing of some of the options you have for collection, which is highly configurable.

The Static Scan Data option, noted above, will conduct a full disk scan and collect forensics on every executable that exists on the machine. The scanner collects digital signatures, hashes, import/export tables, etc., and can even collect the embedded strings of every binary if you’re feeling adventurous. Once that data has been packaged up and sent up to the console, you can use tools like Yara to scan the files for any potential signature hits (that are of course string related).
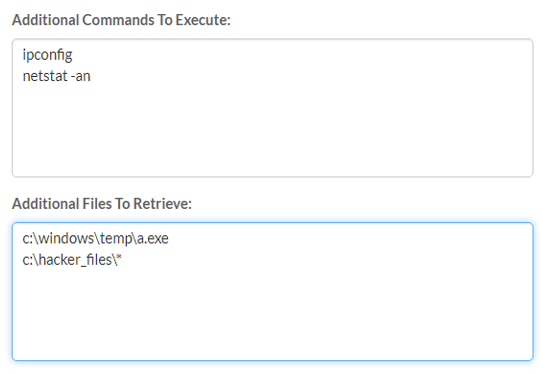
Having the ability to issue custom commands and retrieving specific files of interest comes in handy as well. See below for two additional options you have within the scanner. This is where you can get really creative with what you want to perform ranging from taking memory dumps, executing scripts, to conducting remediation type actions such as removing persistent registry keys from malware, or even killing processes.
Just keep in mind your learnings from Spiderman though, with great power comes great responsibility.

