Over the last year or so, MITRE’s Attack Framework has acquired some significant traction with its use among incident responders and threat hunters alike. If you’ve been living under a rock though, MITRE’s Adversarial Tactics, Techniques, and Common Knowledge is a “curated knowledge base and model for cyber adversary behavior.” The framework consists of 11 tactics, from initial access, execution, all the way through command and control and data exfiltration. Each phase of this attack lifecycle consists of a multitude of techniques that have been observed in the wild being used by various threat actor groups when compromising an organization’s network.
The video clip below is taken from our webinar, Understand, Deploy, and Hunt with MITRE’s ATT&CK Framework, and is presented by Tim Bandos, Digital Guardian's VP of Cybersecurity. You can watch the full webinar here.
When was the ATT&CK Framework Created?

This framework can be extremely useful for gauging an environment’s level of visibility against targeted attacks with the tools that have been deployed across your endpoints and perimeter. That being said, I don’t personally think you need to check off all 282 - at the time of this writing - checkboxes to be uber secure from the bad guys. My approach to this framework has always been to focus more on the higher fidelity indicators while tagging the lower fidelity ones for threat hunting purposes. So what does that mean?
Let’s start off with the Execution phase. Once an adversary has easily tricked Bob in Accounting - who by the way clicks on everything that arrives to his inbox - there will be a series of activities that will execute on Bob’s machine unknowingly in the background. One of those items may be the execution of an ATT&CK technique, PowerShell, which is a built-in Windows tool that is commonly leveraged by malware to install itself. PowerShell is often used by IT administrators as well though, so we can’t alert and block on everything. However, having command line visibility will provide us the means to whittle it down to a set of strings that are typically malicious. Running the functions DownloadFile, DownloadString, Base64ToString, Invoke-Shellcode, EncodedCommand, etc. are all naughty commands that should signal our IR Spidey Senses that an intruder has come a-knocking. Therefore, creating a simple signature that looks like something below will yield a high-fidelity threat alert for your Level 1 crew to immediately investigate.
Process = Powershell.exe & Command_Line contains “DownloadFile, DownloadString, Base64ToString, Invoke-Shellcode, EncodedCommand”
Upon investigating these types of indicators, you’ll often be greeted with a slew of other alerts that amount to feelings of a cyber apocalypse. But never despair, knowledge is power!

If I’m a threat hunter though, I consider this Noob Level 100 and would want to focus on lower fidelity data points that require me to pivot and baseline the environment I’m monitoring to seek out the unknown. Ultimately, this is the primary purpose of a hunter. To shine a light on dark and hidden areas of a network that are often assumed to be clean of infestations. So let’s take a lower fidelity indicator within the Execution phase such as Schedule Tasks. Windows utilities such as schtasks can be used to schedule programs or scripts to run at a specified date/time such as at startup, or on a continuous basis for persistence purposes. Of course there are legitimate use cases for this, but if we tag each event that comes in with the elements of a scheduled task being configured it’ll allow us to quickly shave off the good, so we’re left with the bad. A signature we could use looking for a task added via command line would be something simple like:
Process = cmd.exe & Command_Line contains schtasks
The next step would be to aggregate on Command Line to conduct a frequency analysis. Typically, the items at the top are legitimate (but not always) since they occur more frequently and across the enterprise on multiple endpoints.

The ones at the bottom, not so much. In the below image, we see that the adversary has a sense of humor, calling his scheduled task ‘yolo’ and executing a single character binary ‘1.exe’ out of the Windows\Temp directory upon Logon as the SYSTEM account. Now that the threat hunter has discovered this malfeasance, it shall truly “Only Live Once” and never again!

This method of pairing alarms with events will enrich your logs with the context required to be more effective at hunting. Additionally, adding entries to whitelist these rules will allow them to become higher fidelity.
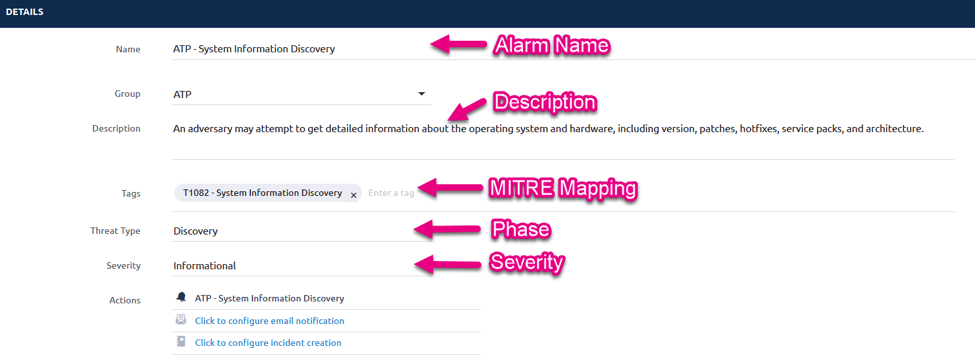
To test out your own environment, I highly recommend checking out Red Canary’s Atomic Red Team framework on Github. This library of tests will walk you through each of the phases of MITRE’s ATT&CK framework allowing you to truly gauge your visibility and readiness for the inevitable. After you’ve gone through this exercise, your goal will be to construct as many detection signatures as possible, mapping them to the specific technique used, along with providing a severity level to delineate between your response times upon triggering. Additionally, a good buddy of mine, Roberto aka @cyb3rward0g, put together a great tutorial on this via Sysmon and ELK; check it out here.
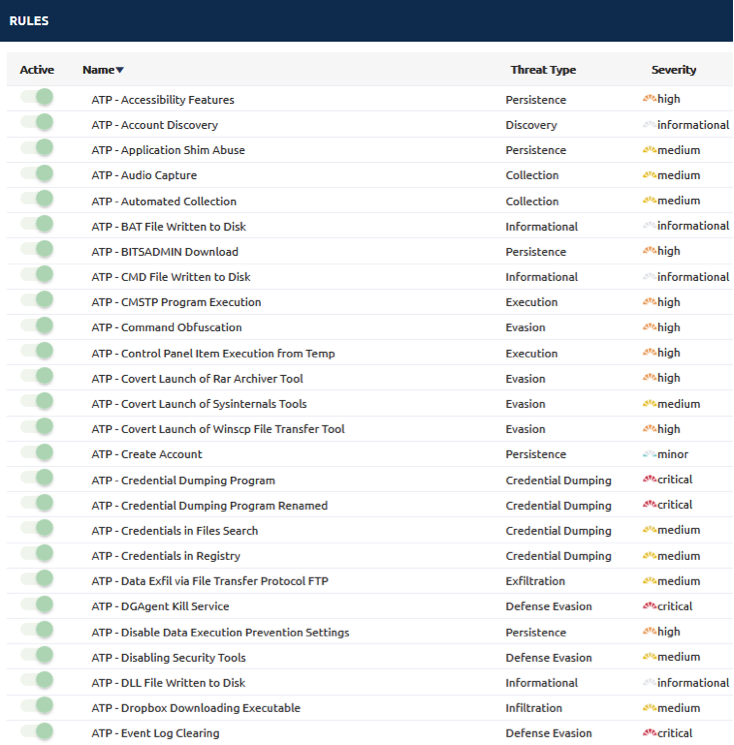
Below is a subset of these rules that Digital Guardian provides with our EDR offering that covers each technique within the framework. #VendorPlug.
Yes, this took quite a bit of effort, but highly worth it and much easier than having to do this all yourself!


In our next chapter of Threat Hunting with MITRE’s ATT&CK Framework - Part 2 - I’ll focus on some more advanced use cases and go into additional details around some of my favorite techniques to use while out in the field. Until next time, Happy Hunting!
Looking to skip ahead to the last part of our guide? Find Part 3 here!

